Written on: January 17, 2022 by George Carey
In the past, underground snow melting of a driveway or walkway for residences had been considered a luxury and perceived as too expensive to install and operate. However, over the years, I’ve seen the number of snowmelt systems installed in residential homes increase quite a bit. The scenario may have been renovation of an existing home that included replacing or upgrading the driveway or it may have been part of a newly constructed home’s design.
Regardless of the situation, it has become increasingly common to install a snow melt system but, unlike other traditional heating systems, once the tubing is installed and piped, it is fairly difficult to fix a design flaw. This is why I find the quote from Bell & Gossett as relevant today as it was 56 years ago: Snow melting systems have been used for many years in commercial installations such as store front walks, parking garage ramps, loading docks, etc. In these installations the protection against slippery pavement is complemented by the elimination of tiresome and messy jobs of snow shoveling or plowing.
The benefits of snow melting systems can carry over into the residential field quite easily. The necessary equipment for a well engineered snow melting system is easily adaptable to any standard hot water boiler. Two of the major limitations to wider acceptance and use of snow melting systems are cost and lack of proper design information. These two characteristics go hand in hand. (1966 Bell & Gossett Snow Melting System Design Manual).
Snowmelting does have some design issues, as well as operating issues, that both you and your customer need to discuss. First, once the customer gets past the installation cost, the next question is always: How much does it cost to operate? The answer depends on a lot of issues, such as how much snow needs to be melted, how quickly it needs to be melted, if the customer “idles” the driveway at some minimum temperature and how cold it is outside. Based upon some standard conditions here in the Northeast, the following example can be used to approximate what it may cost to operate your snowmelt system during a snowstorm. If you have a 1,000 square foot driveway and the snowmelt system provides 200 British Thermal Units (BTUs)/hour per square foot surface area, you would need a boiler capable of providing at least 200,000 BTU/h. In our example, the snowmelt system ran for 10 hours to melt the driveway, so you would consume 20 therms of natural gas or about 16 gallons of oil. Based on the cost of either a therm of natural gas or a gallon of No. 2 fuel oil, you could calculate the cost to melt the snow during that single event.
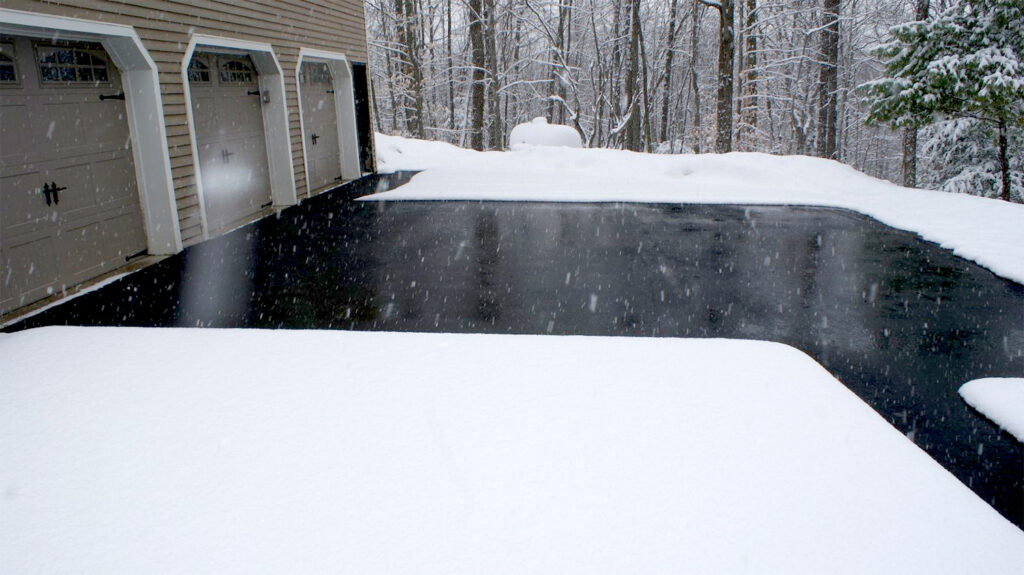
Controlling the melt
How the snowmelt is controlled plays an important part in the cost to operate the system. There are many ways of operating a snowmelt system. They can be turned “on” and “off” manually, automatically and somewhere in between. From an economic standpoint, the system should start as soon as it detects snowfall and turn off as soon as the snow is melted off the driveway. This is probably the least expensive way to operate and still maintain all the benefits of a snowmelting system.
You will want to have a conversation with your customers regarding the expectations they have on what they think their snowmelt system can (and can’t) do. Some people think that when it starts snowing, they can invite their friends over for a snowmelt party. You will want to make sure they understand there is a “time-lag”— it takes time for the snowmelt system to heat up the slab and bring it up to a melting temperature. Once it reaches the melting temperature, the system will continue to run until the automatic snow/ice sensor senses that it is dry and shuts the system off until the next snow fall. This operation may last 4–5 hours and quite possibly longer depending upon the amount of snowfall, how long the storm lasts and the outdoor temperature. You will want your customer to understand this up front, before the first snowfall.
In some applications (usually commercial and industrial), customers can’t wait that long for the snow melt system to activate. Instead, they operate the system in what’s known as an “idling” condition. Most snowmelt controls have a feature where you can set the snow/ice sensor to maintain the slab at some minimum temperature, typically 33–35°F. This gives the snowmelt system a “running start” so that when the snow starts falling, the slab does not have to be heated from a cold starting point.
This, of course, costs money. You are heating a slab all the time, so regardless of outdoor temperatures and wind speeds, you are “pumping” BTUs into the ground. This is another thing your customers need to know when discussing their expectations of the system.
Designing the system
In a residential application, a snowmelt system is a convenience item. You don’t have to wait for the plow guy to show up; you don’t have to shovel the driveway; you don’t have to salt your driveway and walkway and the system can start and stop automatically. However, it does take some time to get up and going before the melting starts.
From a design standpoint, you can use any of the radiant tubing manufacturers or their representatives to help you design and lay out the system. They will be able to help you calculate the actual load, select the right size and amount of tubing, how to best lay out the tubing, the correct design water temperatures, as well as offer a control and piping strategy to operate the system.
In general, there are a few design issues that should concern you. The first issue is if you are going to use the existing boiler to melt the snow. Does it have the capacity to handle this extra load? If not (probably the case in most systems), are you going to dedicate a boiler to just snow melt? This does happen often, but I think a better design is to add the additional boiler to the existing boiler, piped as a multiple boiler plant. Then by adding a plate and frame heat exchanger, which is dedicated to the snow melt system, you can have backup capabilities, rotation and all the other features that come with a multiple boiler system.
When the snowmelt system first turns on, it is very important that the slab/driveway does not get “shocked” with hot water. The control system has to monitor the heat input to the slab in a controlled manner to protect the slab. If not, the driveway will possibly experience cracking. The same issues exist in the boiler room. It is important to prevent large slugs of extremely cold water from entering the boiler(s). This could cause thermal stressing and eventual cracking of boiler sections.
If standard, non-condensing boilers are used, the control system has to prevent flue-gas condensation from occurring for extended periods of time. If not, the system will damage the flue piping and eventually the cast-iron sections. All of these issues can be handled easily with proper piping and a proper control strategy. Again, something that the radiant tubing manufacturers deal with in every system they design.
If you have any questions or comments, contact me at gcarey@fiainc.com or 1-800-423-7187. ICM