Written on: May 3, 2019 by George Carey
Have you ever wondered if the pipe you are using in that hydronic heating system is the right size? What I mean is, is it the right size for a specific flow rate? Ever wondered how you calculate the gallons per minute (GPM) for that heat loss? The answers to these questions are very important because they will help determine the proper circulator for the heating system.
To find these answers, you have several options: you can use some math formulas that were established years ago; you can look up the various charts relating to flow rate in GPM and pressure drop based upon pipe sizes; or you can use Bell & Gossett’s System Syzer.
The System Syzer was developed by an engineer from Bell & Gossett named Gil Carlson. He was considered the “Father of Modern Hydronics” because his name has been associated with things hydronic. He promoted the concept of “pumping away” and the “point of no pressure change.”He developed the circuit setter, a helpful device for balancing hot water systems. He advocated trimming impellers to fine tune a commercial pump for its particular application—don’t waste energy and horsepower! Carlson also helped to develop and promote the pumping concept known as Primary/Secondary pumping. Needless to say he was deeply involved in hydronics. This is why he developed the System Syzer. He was constantly looking for charts and books for information to perform his calculations. To make it easier on himself, he developed this little calculator wheel. It contained all the information he would need to design or troubleshoot a hot water heating system.
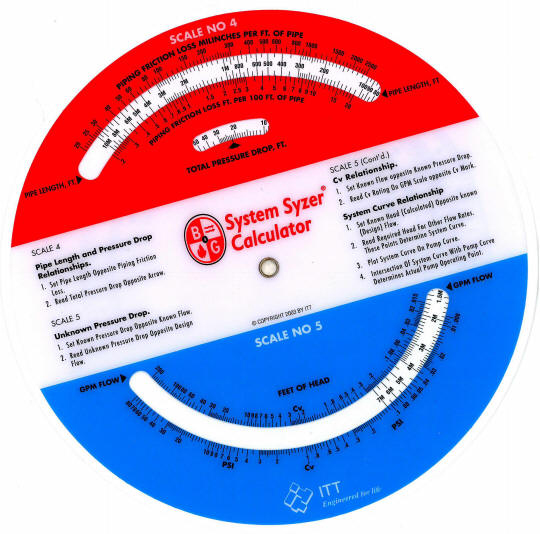
System Syzer Scale #1
The original wheel made of cardboard was 17 ½” in diameter. It is located at Bell & Gossett’s Little Red School House in Morton Grove, IL behind a glass enclosure. Nowadays, the wheel is made of plastic, measures 8″ in diameter and comes with five scales.
The first scale describes the relationship that exists between flow rate in GPM, British thermal unit (BTU) load and temperature difference. If you know two out of the three pieces of information, the wheel can give you the third piece of information instantly. For instance, if you know the BTU load and the desired temperature drop, by looking at the small window on Scale #1, the necessary flow rate in GPM is selected with a small arrow pointing at it. Scale #1 is very useful because it helps you establish GPM (the required flow rate) easily. Conversely, if you are out in the field on a problem job, by knowing the system’s flow rate and the temperature drop of the water, you can establish the actual BTU load that the system is seeing at that time.
I often explain to heating professionals how they can select smaller flow rates (GPM) by simply increasing the system’s allowable temperature drop. Traditionally, in this industry, we design around a magical number of 20°F temperature drop. By simply increasing this temperature drop to 40°F, you will have successfully cut your required flow rate in half. It’s all right there on Scale #1!
Scale #2
Scale #2 is used to select the proper sized pipe to handle your GPM flow rate. The scale lists two types of pipe: type L copper and schedule 40 iron pipe. From Scale #1 you established the required flow rate; Scale #2 allows you to select the right size pipe to support your flow rate. No more guessing! The scale lists pipe sizes from 3/8″–12″ and gives the friction loss in feet of head per 100′ as well as in millinches. Scale #2 can also be very helpful when trying to select a new pump in a boiler room. If all of the tags from the boiler and original pump are missing, you can use the existing main hot water pipe as a guide. Based upon its size, you can look on Scale #2 and determine the maximum flow that particular pipe can handle. It at least gives you a basis from which to build your theory.
Scale #3
Scale #3 confirms the proper pipe selection from Scale #2 by checking the velocity of the water. It might seem subtle, but there is a difference between friction loss in head energy versus the velocity in feet per second of the water moving through a given pipe size. Scale #3 makes sure that the selected pipe will not be noisy due to the water moving too fast. The last thing a homeowner wants to hear when the thermostat calls for heat is a whistling noise as the water screams through the baseboard piping. Whenever I select a certain size pipe to handle the GPM, I always glance down at Scale #3 just to make sure it falls within industry standards.
Scale #4
Scale #4 is like a calculator. It will tell you what the Total Pressure Drop is for a particular loop, zone or even the total system. For example, from Scale #2, you selected a certain size pipe and the scale listed out the unit pressure drop per 100′ of piping. When using Scale #4, you plug in this unit pressure drop per 100′ against the total length of piping and read the total pressure drop in the small window. Therefore, if I selected a pipe that offered 4′ of pressure for every 100′ of pipe and the total run of piping was 500′, then the total pressure drop would be 20′. This helpful information is needed when selecting a circulator.
Scale #5
Scale #5 is the most useful and yet can be the most confusing. It is based upon the fact that the friction loss described as feet of head in a hydronic system will vary approximately as the square of the change in flow rate. Scale #5 is set up to perform three functions: figure unknown pressure drops, establish system curves and select control valves based upon their Cv ratings.
When circulators are sold, sometimes they are selected by what is known as the “inventory method”…it’s the only one available! When this happens, the circulator may be a little too big or a little too small. By using Scale #5, you can build a system curve right on the pump curve chart, determining exactly where this “inventory” circulator will operate. Obviously, if the circulator is a bit too big, it will be pumping more GPM than required, which might not be a big deal as long as the increased flow rate does not exceed the pipe’s maximum velocity. If the circulator is a little too small, it will be pumping fewer GPM than required, which isn’t necessarily a bad thing, as long as the increased temperature drop does not reduce the output of the radiation. In my “Hydronic System Design” seminars, we go over these examples in great detail. Students are amazed when they finally “see” what’s going on inside those hydronic systems.
Scale #5 can be used to select control valves based upon their Cv ratings. Every valve manufacturer tests its valves to establish a Cv rating. Cv is a valve coefficient that states the necessary amount of flow (in gallons per minute) that must flow through the valve’s seat opening to cause a one-pound pressure drop across the valve. For example, a residential ¾” zone valve has a Cv rating of 3.5. This means when a flow rate of 3.5 GPM of water passes through the valve, the valve will cause a one-pound pressure drop. It will “eat up” one pound of energy head.
Another way of expressing one pound of pressure drop is 2.31′ of head loss. So if the zone valve has a Cv rating of 3.5 and you pump 3.5 GPM through the valve, the valve itself will create 2.3′ of head loss. This information is important when sizing a circulator, because in addition to calculating the pipe and radiation head losses, you have to account for the control valve’s pressure drop.
Also, by knowing a valve or any component’s flow/head rating, you can calculate the actual flow in the system by the simple use of pressure gauges. By reading the pressure before and after a pressure gauge, converting this pressure differential reading into feet of head and applying this head loss to the pump curve, you can determine the actual flow rate in the system.
Bell & Gossett’s System Syzer is a very useful tool for anyone involved the hydronic heating business. If you have any questions or comments, e-mail me at gcarey@fiainc.com, call me at (800) 423-7187 or follow me on Twitter at @Ask_Gcarey. ICM